Haarlemmer Halletjes

This week's cookie falls knee-deep into the category of "koffiekoekjes": thin, crisp, spiced cookies that don't look all that special, but that make a cup of coffee or tea a memorable occasion: they dunk well, taste delicious, and make you reach for just one more. Sometimes they don't even get a name, they're just called "koffiekoekjes" or "theekoekjes", but today's cookie does have a name: Haarlemmer Halletjes. 

An advertisement in the Oprechte Haerlemse Courant from January 3rd, 1711, states that "Eymert van der Schee, who lives in Haarlem in the Korte Veerstraet in the house called "Het Halletje"*, where the Halletjes Biscuits were first baked, and from where they have received their name, announces that these Halletjes Biscuits are nowhere else as good as those obtained from him. They are soo delicate and durable lasting, good for 5, 6, and more years, without the slightest change; whereby they, after all, could be sent to all distant lands.  Those who want to purchase these Halletjes Biscuits can do so at the aforementioned house.

It is fair to say that Eymert was no fool: by placing an advertisement claiming that his cookies were the real deal, all the other bakers in town were immediately labeled as copy-cats. However, it should be said that Van Der Schee was probably not the original inventor of the recipe, as one Claas Jacobs baked from that same house 150 years earlier cookies under the same name. 

Nevertheless, the Haarlemmer Halletjes became famous, were indeed shipped all over the world, and are still, to this day, a must-have treat when visiting the beautiful city of Haarlem. 

Fortunately, you can also bake these at home! The following recipe is good for about 30 to 40 cookies. They will not last as long as "5, 6 and more years, without the slightest change" per Van Der Schee's statement, mainly because everybody will be able to smell them a mile away and will be wanting to know what you're up to. Just do as I do: hand out 30, and keep 10 behind. Baker's treat ;-) 

Haarlemmer Halletjes

1 1/2 cup (185 grams) all-purpose flour

4 1/2 tablespoons (65 grams) butter, cold

3/4 cup (115 grams) brown sugar

2 teaspoons ground cinnamon

1 teaspoon ground cloves

1 teaspoon baking powder

1/4 cup (60 ml) water

In a bowl, add the flour. Cut the cold butter into small pieces and mix in the flour with the brown sugar, cinnamon and cloves, and the baking powder. By hand, rub the mix together until it resembles wet sand, then add the water and knead into a pliable dough, for about three minutes. The dough should come loose from the bowl and your hands. Pat the dough into a ball, wrap it in plastic, and rest in the fridge for 1 hour. 

Remove from the fridge. Let the dough sit out for about ten minutes, then break off a piece and roll it between two sheets of plastic (I usually cut up a large 2 gallon ziploc bag for this), or dust the counter lightly with a bit of flour and roll the dough out, to about 1/8 of an inch (3 mm). Use a cookie cutter about 2 to 3 inches in diameter (6 - 8cm) (or square, it doesn't really matter, pick a shape you like!), and cut out the cookies. Line a baking sheet with parchment paper or a silicone mat, and place the cookies on the sheet. Heat the oven to 375F/190C and bake the cookies, about 12- 14 minutes, on the middle level in the oven. 

Cool on a rack, and they will crisp up as they cool. Do plenty of tasting unless you are home alone because they will be gone before you know it! 


Sources: Bakkers in Bedrijf, Delpher

*In Haarlem, houses were often named, like The Orange Flowerpot, the Scissors, The Three Sugar Loaves, or Het Halletje, as we saw here, so the people who lived there could say " I am Jan Janszoon from The Orange Flowerpot". I bet that, in a city with hundreds of Jan Janszoons, it would be a welcome way to determine who was who! The houses often showed their name through colorful placards hanging from the facade. It must have been quite a sight! 

Riefkook (Reibekuche)

When I was young, like many other Dutch families we used to stay on a camping in northern Limburg during the summers. It was a kid's dream, and we still talk about those times when I meet up with other campers of those days. We had a big swimming pool, a large play area with lots of equipment to climb on, in, or fall out of, miniature golf, and plenty of trees to get lost among. But the best thing about going to the swimming pool was not the swimming or the pool itself, it was the small fry shack right outside the fence. 

To this day, when I catch a whiff of french fries, it reminds me of that small frietkraam. Actually, what I remember is just a sliding window, with a hand sticking out, handing a cone of french fries to whoever was next in line. I couldn't tell you who worked there, what it looked like on the inside, or even what the color on the outside was. But I have one very distinct memory, one that hasn't left me since then. One day, I am on my way back from swimming. I am about 8 years old. I have enough change with me to get a cone of fries, and I am looking forward to getting my jaws around those hot, golden fries. Super excited I stand in line, waiting my turn to order and when I reach the window, I said "eine patat mét, astebleef" (one portion of fries with mayo, please), and hand over the contents of my sweaty little fist. 

"Det is neet genóg", says a voice. I freeze. What? Not enough? I must have lost some of the coins on the way! He must have had pity on me because he says "wach effe" and hands me a paper cone with something hot inside. I step aside and look. In the paper cone is a golden yellow disk, flat but big and round. A riefkook! And my disappointment turns into delight: one bite of that crispy, salty, shredded potato patty was like biting into a fistful of french fries at once: delicious!!! 

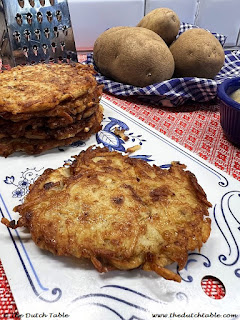
So strong are food memories that, forty-some years later, I still remember biting into that riefkook. It's an insignificant memory but still, it's there. Now, I suspect that if you did not grow up in Limburg, or on the border with Germany, you may not be familiar with riefkook. It's called reibekuchen in German, and they are fried potato patties, made from shredded potato, egg, flour, and onion. In Limburg, you can find these all over the frietkramen, the french fries places. They're not often served with anything, like mayo or mustard, but I can tell you that they're delicious with a dab of applesauce! Riefkook are usually eaten as a snack, but there is no reason why they could not replace your hashbrowns at breakfast time, or be a potato variation for dinner. Go for it!

Riefkook

1.5 lbs (750 grams) potatoes
1 medium-sized onion
2 eggs
1/4 cup (30 grams) flour
1 teaspoon salt
1/2 teaspoon freshly ground black pepper
Oil for frying

Peel the potatoes and shred them on the side of the box grater with the large holes. Put the grated potato in a colander, and give them a quick rinse. Squeeze out the water and set aside to drain. Mince the onion. Get a large frying pan and add enough oil to cover the bottom. 

Squeeze the potatoes again and get rid of the liquid. Mix the potatoes with the shredded onion, the eggs, the flour and the salt and pepper. Mix well. Prepare a platter with a few paper towels on the side, and get two spatulas, and an ice cream scoop or two spoons. 

When the oil is hot, take a scoop of the potato mix and put it in the pan. Flatten it with a spatula and tuck in the edges so that it forms a round circle. Repeat until the pan is full, but with enough space around each riefkook, like the picture above. Fry for about three to four minutes on medium-high, then use two spatulas to flip it over. The bottom should be golden brown. Fry the other side for two more minutes, or until golden, Rest on the paper towels to absorb some of the oil. Keep warm until served. 

Makes 12 - 14 medium sized riefkook.

Laot ut och smaeke!


Gebakken Mosselen

 Last weekend, I was really craving fish: a fresh herring, a little bit of smoked mackerel, a lekkerbekje, or even a small tray of kibbeling (with remoulade sauce of course), would have satisfied my palate. Even a portion of smoked eel would have done the trick! It made me realize how fortunate we are in the Netherlands, where there are still specialized fishmongers in almost every town, right next to the cheese shop, the local bakery, and the butchers. Of course, I am well aware that slowly but surely these specialized shops are disappearing, as so many buyers prefer to shop and get everything from the local supermarket. The danger in that is, and that is not only in the Netherlands but everywhere else, that these specialists with their unique recipes, products, and knowledge, retire or close up shop - and that the knowledge is lost forever. 

But back to the fishmongers' store: here you can find a large variety of fresh fish and seafood, as well as prepared foods. Large platters with a variety of fish, seafood, marinades, and dipping sauces are available for the barbecue (grill) for those summer weekends, or for those gourmet evenings with friends and family. Soft white rolls are stuffed with herring, eel, mackerel, fish paté, or smoked salmon for a bite on the go. They sell shrimp, salmon, herring, or mackerel salads by the portion or by the kilo, for lunch, or for a party. I could go on and on about the amazing foods you can find at the visboer....and most of this is made in-house, and according to traditional recipes. 

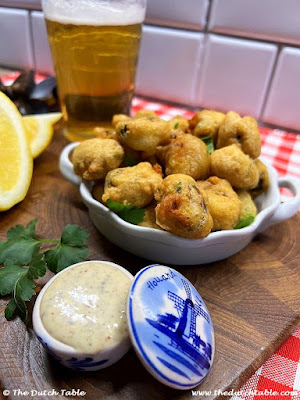
After cooking up mussels the other day, I was left with about two pounds after dinner: a typical case of eyes bigger than my stomach....but not really, for I had a cunning plan; fried mussels!! These babies are scooped out of their shell, battered, deep-fried, and served with a dipping sauce. Delicious as a snack, with a cold glass of something or other, or served with a fresh spinach stamppot, for example, for dinner: these mussels are very versatile! 

If you prepare them from scratch, use this recipe for 2 lbs (1 kg) mussels, but substitute the cup of wine for beer, and cool them after steaming. Two pounds of mussels will give you approximately 8 ounces (225 grams) of meat. If you don't care for beer or wine, you can fish stock or plain water. Use seltzer water for the batter, if you can. You can also often buy already shelled mussel meat in the freezer section. 

I used the same mustard dipping sauce that I had for the steamed mussels, but you can also make a remoulade sauce or one of your own liking.

Fried mussels

8 oz (225 grams) mussel meat
1/4 cup flour (75 grams)
1/2 cup (100 ml) beer
1 egg
1/2 teaspoon baking powder
1/4 teaspoon salt
1/8 teaspoon paprika powder
1/8 teaspoon chopped garlic
1/4 teaspoon onion powder
4 sprigs fresh parsley, chopped finely (or 1/4 teaspoon dried parsley leaves)

1 lemon

Pat the mussels dry and look for any shell pieces or "beards", small tendrils that are attached to the mussel. Remove. Mix the flour with 3/4 of the beer, the egg, the baking powder, and the rest of the ingredients. Let it sit for five minutes, while you prepare the dipping sauce(s). The batter needs to be thick, like the consistency of thick American pancake batter. If it's thickened too much, add a bit more of the beer and stir. 

Heat the fryer to 350F. Set a large platter or a bowl to the side with a few paper towels to soak up the grease. With two spoons, dip each mussel in the batter, and shake off as much batter as you can. Drop them carefully in the hot oil. Fry the morsels golden brown, for about four minutes, and fish them out of the oil, and onto the paper towels. 

Slice the lemon in quarters and squeeze over the mussels. Time to dig in!

Serves four. 


Fries Suikerbrood (Fryske Sukerbole)

Frisian sugar loaf slices
Sûkerbôle 
or suikerbrood, sugar bread,  is a traditional bread from the northern province of Friesland, in Holland. Other provinces such as Limburg and Brabant have a similar recipe for sugary bread loaves but what sets the Frisian bread apart is the high amount of sugar. In comparison to other regional recipes, Frisians use twice as much sugar. It's therefore a sticky, sugary loaf, but oh so delicious! 

The sûkerbôle was often given to a new mother to celebrate the arrival of a baby girl; for baby boys, it was a raisin cake.

The sugar used for this recipe is called pearl sugar and is hard to find in a regular store, so I order mine from Amazon (here's the link)* Crushed-up sugar cubes are a good substitute: put them in a clean towel, fold it over, and give it a few whacks with t with a rolling pin. Not too hard! You want to have sugar lumps, not finely ground sugar. Handfold these lumps in the dough after the first rise.

Fryske Sûkerbôle
2 teaspoons dry active yeast
3/4 cup + 1 tablespoon (200 ml) milk
3 1/2 cups (500 grams) all-purpose flour
1 teaspoon kosher salt
3 tablespoons ginger syrup (optional)**
1 egg
5 tablespoons (80 grams) butter, melted
1 tablespoon ground cinnamon
1 cup (150 grams) pearl sugar, or crushed sugar cubes

For the pan: 
2 tablespoons butter, melted
1 tablespoon regular sugar

Add the yeast to the warm milk. In a mixing bowl, mix the flour with the salt. Pour in the milk and yeast and mix together. Knead in the ginger syrup if using, the egg, and the melted butter until the dough forms a soft and flexible dough. This will take a little while, as the dough at first seems scraggly, about a good ten minutes. Cover and rise until double its size.

On a lightly floured counter, roll out the dough in a rectangle (about the length of the pan) and sprinkle the cinnamon over it, and then the pearl sugar. Now roll the dough into a loaf shape (first fold the sides towards each other, covering the sugar and cinnamon, then roll up into a loaf). Some of the pearl sugar may fall out - just roll the dough over it so it gets embedded on the outside. 
Sugar and cinnamon filling

Butter the inside of a 9 x 5 inch (23 x 13 cm) loaf pan with the melted butter, but save a little bit for the loaf itself, about half a tablespoon. Put a tablespoon of sugar in the pan and tilt it forward towards each side so that the sugar coats the whole inside. Place the loaf inside, seam down. Cover and rise for about 15 minutes, or until loaf peaks out from inside the pan.

In the meantime, heat your oven to 375F (190C) degrees. Bake for 30 minutes or until loaf is done (measure with a digital thermometer: look for 190F or 87C). If the top browns too quickly, tent the loaf with aluminum foil.

As soon as the bread comes out of the oven, brush the top with the leftover melted butter. Cool the loaf for about five minutes, then carefully loosen the bread from the pan as some of the sugar may have caused the bread to stick. Remove the loaf and continue to cool on a rack. If you want a supersticky loaf, put the bread in a plastic bag when it's still lukewarm. 

Awesome with a curl of real butter!


Buttered sugar loaf on a plate


* this is my Amazon associate's link. If you purchase something through this link, I will get a few pennies (literally) at no cost to you. All the proceeds are used to maintain this website.

** If you don't have ginger syrup, don't worry. I soak a tablespoon (10 grams) of chopped candied ginger and one tablespoon of sugar in two tablespoons of hot water. Let sit for about a good hour, then remove the ginger and use the syrup. Or....if you like ginger as much as I do, add the chopped pieces to the dough. What's the worse that can happen? Exactly. 

Friese Uiensoep (Fryske Sipelsop)

The Frisian language is such a unique language, and so different to Dutch. Just look at the name of this dish. Ui, meaning "onion" in Dutch, and "sipel" meaning the same thing in Frisian. Where do these differences come from? Well, I am glad you asked! According to the etymology of the words, "ui" has its origins in the French language, "oignon", where also the more old-fashioned word "ajuin" comes from, another Dutch word for onions. In Friesland, however, they veered more towards the Germanic side of things, hence "sipel" which stems from "zwiebel", the German word for onion. 

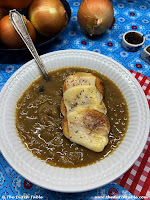
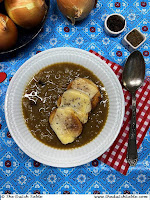
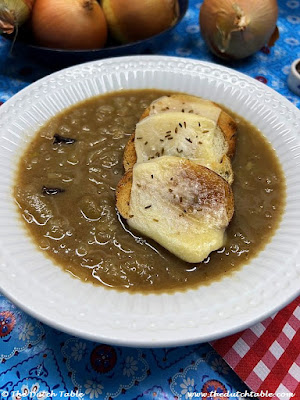
Fortunately, the soup doesn't care where the words come from, as it's as tasty made with "uien" as it is with "sipels". This is a thicker soup with a slight tangy flavor, and warming qualities: perfect for this cold weather we're experiencing here! The traditional cheese used for the toasted bread slices is Frisian cheese, a delicious kanter-style cheese flavored with cloves and cumin seeds. If you have access to it, great! If you don't, which is most likely, I've adapted the recipe so that you have the same flavors. 

Use a heavy-bottomed skillet to caramelize the onions. Caramelizing the onions is a task of patience - browning the onions is slow, but it's so worth the effort as it gives a great color and fantastic flavor to the soup. I use this time to listen to Dutch radio or TV: it's a great distraction!

Friese Uiensoep

2 lbs (1 kg) onions, peeled and sliced in half moons
2 tablespoons (30 grams) butter
1/4 cup (50 grams) flour
4 cups (1 liter) vegetable or beef stock
4 whole cloves
2 tablespoons of Worcestershire sauce (optional)
Black pepper
Toasted bread rounds or croutons
2 oz (50 grams) Gouda (-type) cheese, grated
Pinch of cumin seeds
Salt

Melt the butter in a heavy-bottomed skillet until hot, and stir in the onions. Keep stirring frequently, until all the onions are golden brown. This will take at least a good 20 to 30 minutes on medium-low heat. When they're golden, sprinkle the flour over the onions and give it a good stir so that the onions are coated, and continue to brown for a minute or two. Stir in the stock a little bit at a time, making sure that it's incorporated well, until it's a thick soup. Add the cloves and simmer for about twenty minutes. Season with salt and pepper to taste. Remove the cloves and stir in the two tablespoons of Worcestershire sauce (optional). 

Top the bread rounds with grated cheese and melt the cheese under the broiler (I give it a quick 30 seconds in the microwave if I don't want to heat up the oven). Add a pinch of cumin seeds on top and serve with the soup. 

Serves 4. For a more substantial meal, chop fine 1 hardboiled egg per plate, and ladle the soup over the egg right before serving.


Groningse Eierbal

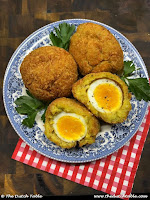
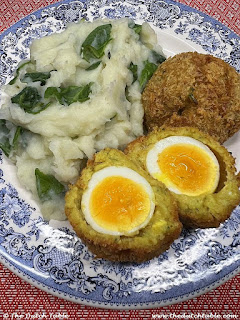
Eierbal (egg ball), or aaierbal in the Groningen dialect, is a treat like no other. It's similar in looks to the Scotch egg, but whereas a Scotch egg has a wrapping of ground meat or sausage, the eierbal has a thick gravy coat, seasoned with curry spices and fresh parsley. Both contain a whole boiled egg, and both are breadcrumbed and deep-fried until they're golden and crispy, but where the Scotch egg gives a solid bite, the eierbal is creamier, much like a bitterbal or a kroket. The egg in the Gronings specialty is also soft boiled so that the yolk is still a little liquid. Heaven!

Contrary to other snacks, like the frikandel, the eierbal can not be found everywhere and seems to be specific to Groningen and surrounding areas. There is one place, in Venlo, Limburg, that claims to have been the originator of the treat, but the proprietor lived in Groningen for a while so possibly got her inspiration there. 

So how did this deep-fried egg ball happen to be in Groningen? I am glad you asked! During WW1, the Netherlands was neutral and provided a safe location for many English soldiers who were fleeing from the Germans in Belgium. They were interned in a camp in Groningen, named Timbertown. Up to 1,500 soldiers were housed here at one time. 

Photo source: Friends 
As the war progressed, the men became restless but as they were unable to leave the camp, they entertained themselves with theatre, music and....food! A couple of lads opened up a chip shop on the premises. They named it the Timbertown Chip Shop, and were open every night from 4 PM - 8 PM. 

It is very, very possible that these men also made Scotch eggs, seeing as how the Scotch egg was already known for several centuries in England. As they were also in contact with the locals, it is easy to see how the idea of wrapping boiled eggs would have stuck. 

Since then, the eierbal has nestled itself so deeply into the local tradition and culture, that the golden snack was added to the inventory of Immaterial Cultural Heritages in 2017. As it appears to have been around since the early 1900s until now, you can imagine that the recipe has developed: almost everybody has a favorite snackbar to get their eierbal fix, or makes the recipe slightly different, but they're all considered eierballen, and they're all considered a Groningen tradition. 

I decided to make these after working on videos from Groningen for our YouTube channel. Many of you have commented on how much you enjoy the nostalgic throwbacks to older times, and see how our parents and grandparents lived. I was also making dinner at the time and decided to serve mine as a meat alternative with spinach stamppot. Not traditional, but delicious nonetheless! 

I chose to make the most traditional version, those with a curry ragout, but if you're making kroketten or bitterballen one of these days, you may try it also with a meaty ragout to see if you like it or substitute the curry powder with Mediterranean herbs, or something else you favor. I can also see where falafel seasoning would go well. You can also brush the egg with flavorings (sweet chili sauce, or mustard), so this recipe is perfect for turning it into a family exclusive! 

Groningse Eierbal

4 eggs

3 1/2 tablespoons butter (50 grams)

1/2 cup flour (100 grams)

2 cups vegetable or chicken bouillon (450 ml)

2 1/2 teaspoons curry powder

2 tablespoons chopped fresh parsley

1 egg

1 cup breadcrumbs or panko (50 grams)

2 tablespoons flour

Oil for frying

Melt the butter in a skillet and stir in the flour, until it looks like wet sand. Slowly stir in the bouillon until you have a thick sauce, about four minutes. Add the curry powder and the parsley (or other flavors) and keep stirring for another two more minutes. Line a shallow pan with plastic film, pour the ragout sauce over it, and tap another piece of plastic on top, touching the sauce. This will keep it from drying out. Chill the ragout overnight, or for at least four hours, until solid. 

Boil 4 eggs for 5 minutes, then shock in cold water and peel. Divide the cold ragout into four pieces, and wrap each piece around an egg, shaping it into a round ball. This does not have to be precise, so do the best you can! Roll the wrapped eggs in a little bit of flour. Beat the 5th egg, and roll each egg in the egg wash, let the egg drip off a little bit, and then roll it in breadcrumbs or panko. Pat together and shape into a ball again. If you want, you can repeat the egg and breadcrumbing for a thicker coating. If you feel that these are too big, or want more of a small snack, boil the eggs one minute longer, and cut in half before wrapping.

Heat the fryer to 350F (170C) and carefully drop the eierballen in the fryer, one or two at a time. All at once may overflow the fryer, or drop the temperature too fast. Fry for five to six minutes, or until all sides are golden brown. Drain on a tray with kitchen towels to soak up some of the grease. Serve cut in half, cold or hot. 


Sources: Sikkom, Friends

Drentse Turfkoek

This week, I spent some time editing and posting videos on our YouTube channel about the province of Drenthe and its role in peat production during the last two centuries. Commercial peat logging started in the second half of the 19th century and lasted until the middle of the 20th century, but as early as the 16th century, the people in the Netherlands used dried peat (turf in Dutch) to heat their homes. 

Logging the raised bogs caused the landscape to change drastically, as you can imagine, as several canals were dug to benefit the transportation of the fossil fuel. For a short while, people from all over the country moved to Drenthe to try their luck in the industry, but life as a peat laborer was tough. When newer sources of fuel emerged, such as the Limburg coal, the peat industry dwindled quickly. Fortunately, it prevented the province from losing all of its natural beauty, so if you find yourself in the Netherlands with some time on your hands, it is an interesting destination to visit. 

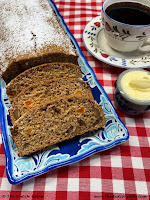
And when you do, you will see that Drenthe embraces its turf history with gusto. A typical product that you will find at local bakeries, and slices of it offered with your cup of coffee, is the Drenthse turfkoek, a turf cake, so called because of its appearance. Its shape, elongated and rounded at the edges, is said to mimic the shape of a peat log. This is a fairly new invention, which results in different bakers using a variety of approaches, all tasty and delicious. The main ingredients are koekkruiden (a mix of herbs and spices), brown sugar, milk, and dried fruits and nuts. I used brandied walnuts, raisins (boerenjongens), and apricots (boerenmeisjes) from my oliebollen baking on New Year's eve, but you can also use apple, chocolate chips, or anything else that you fancy. You're looking for a sturdy cake with lots of chunky fillings, much like a peat log, but better tasting :-)

If you don't have an oval tin to bake in, you can easily use an 8 x 4, or a 9 x 5 cake form. 

Drentse Turfkoek
1 3/4 cup all-purpose flour (250 grams)
3/4 cup dark brown sugar (150 grams)
2 teaspoons baking powder
pinch of salt
3 teaspoons koekkruiden*
1/4 cup chopped walnuts (75 grams)
3/4 cup dried fruits (currants, raisins, apricots...)** (100 grams)
1 egg
1 cup milk (250 ml)
1 tablespoon powdered sugar

Mix the dry ingredients together (flour, sugar, baking powder, salt, spices, walnuts, dried fruits). Beat the egg with the milk and pour the liquid into the bowl with the dry mix. 

Grease a baking form, pour in the batter, and bake at 325F for 40 minutes, or until the cake is done. Test for doneness with a toothpick or metal skewer: if it comes out dry, the cake is done. 

Cool on a rack for five to ten minutes, then take out of the form and wrap in clingfilm. As the cake does not have any fat, it will dry out faster, so keep it wrapped. 

Dust lightly with powdered sugar, and slice in thick slices, slather with butter (or not) and serve with a cup of coffee or tea. 


* For koekkruiden, mix 3 teaspoons ground cinnamon with 1/4 teaspoon nutmeg, 1/4 teaspoon ground ginger, 1/8 teaspoon cardamom, 1/8 teaspoon ground coriander, 1/8 teaspoon ground white pepper, and, if you have it, 1/8 teaspoon of dried orange peel. If you like the flavor of anise, add a 1/8th teaspoon of ground anise to give it a special twist. Smell and decide if you like it.  You are welcome to make it your very own, but make sure you write down the quantities and ingredients so you can replicate your personal recipe. Store in an airtight jar. You can also use speculaaskruiden which have the addition of 1/8 teaspoon ground cloves. 

**soak your dried fruit in warm water for thirty minutes, then drain and pat dry before folding in the flour

Slemp

Happy New Year!! Today is January 1st, the first day of a new year. After a whole month of eating, visiting, partying, and coming up with all kinds of good intentions for the new year, today is a good day to go "uitwaaien", to let the wind blow the cobwebs from our brain, to air out the stuffiness from too much sitting inside and being cooped up with other people. (Our Calvinistic upbringing is probably reprimanding us that we've done too much indulging and that it's time to get back to normal) So get your coats on, bring hats and mittens, and let's go for a brisk walk: on the beach, in the forest, or in the city parks. 

It doesn't matter where you go, as long as you go. If you're out and about today in the Netherlands, you'll see that many with you are "uitwaaien"- it's traditional to seek out nature, and the country has many places where we can get out and about. Several brave souls even venture out into the North Sea for a quick New Year's dip in its icy waters! 

And after a long, chilly, brisk walk (or swim), there's nothing more gezellig than to come back to the house and have a warm glass of slemp, a flavorful hot tea drink made from milk, cinnamon, cloves, saffron, and sugar. It's traditionally a new year's drink: its warm spices and milk nourish the body and the brain (and is said to restrain regurgitating reflexes for those that partied a bit too hard last night). It's also the perfect drink to finish the leftover oliebollen from last night with :-)

Wrap your cold hands around a warm mug, sit back and put your feet up, sip slowly, and let's make a plan to get the most out of the new year that we can. We have 365 days of adventure, miracles, new directions, and excitement ahead of us - let's make it count! 

Slemp
2 cups milk (500 ml)
3 cloves
1 cinnamon stick
1 heaping teaspoon tea leaves, or 1 tea bag
Pinch of saffron
2 tablespoons sugar (or sweetener of choice)

Simmer the milk with the cloves, the cinnamon stick, the tea leaves, and the saffron until warm and flavorful, about fifteen minutes on low. Stir in the sugar until it dissolves. Makes 2 cups.


Happy Easter!

It is amazing to me how fast time goes. It seems only yesterday that I was getting ready for our family Easter brunch, and here we are again. A year further, perhaps a bit wiser, but definitely a year older! 

The Dutch Table's Paashaasjes
The Netherlands celebrates Easter in a similar way as it does Christmas, spread over two days. In the case of Easter, First Easter Day is always on Sunday, Second Easter Day is on the Monday following and is often a holiday.

The gathering of family and friends around the breakfast, lunch, or dinner table is key on First Easter Day. Stores are closed, children are dressed in their "Paasbest" (Easter Best) with new clothes and shoes. Eggs are colored, hidden and if lucky, all found. The breakfast or brunch table will be laden with different types of bread (multigrain, tiger rolls, Easter breads). To the right, you see our own traditional Paashaasjes, Easter bunny rolls, but you can always come up with your own design! 

The breakfast or brunch table will also have various bread toppings, deviled eggs, a couple of warm or cold egg dishes, and large amounts of coffee. Lamb is a traditional dish served for Easter.

And if you're skipping brunch or have friends and family over for coffee or tea later, you can also serve something sweet: a Paastaart, or Easter cake, a variation on our traditional slagroomtaart, whipped cream cake. Decorated with fluffy whipped cream, a light biscuit batter and an adult amount of advocaat, this Easter cake will put a smile on your face. 

Have a wonderful Easter weekend! 

Nicole

I've listed the recipes below as well:

Bread/Brunch:
Paastaart, Easter Cake


Coffee Time:

And there are many, many more recipes - it doesn't have to be egg or Easter-related to be good! 

Merry Christmas everyone!

 Let's get through the next few days unscathed, so we can get ready for oliebollen time!


Korstjes


It snowed yesterday and today. There is something so gezellig about a good snow fall when you're safe at home, something that makes me want to curl up on the couch, grab a book and let the day be the day. Quite a while ago, a reader asked me about a recipe for korstjes. It was mentioned in a book she was reading to her grandchildren, and wondered if I had heard of that particular treat. At the time, I had not but filed it away on the to-do list, and ordered the same book, just in case. 

Fast forward to this year. I was poking around the Albert Heijn grocery store in the north of Holland, when my eye fell on a curious package in the bakery section. "Korstjes" it said, and at first I didn't make the connection. "Korstjes?", I thought, "who wants to buy korstjes?" thinking of the crusts you cut off sandwiches, but when I held the package in my hand I realized I was looking at something much more appetizing, and remembered the request of my reader. Of course they landed in my basket, and am I glad they did! They visually appear to be korstjes, crusts, as they look like they were cut off from something bigger, hence the name, but the flavor and texture is much more akin to taai-taai: a chewy, flavorful spiced type of honey cake. Perfect for this time of the year! 

When I came home, I immediately dug out the book to see where these korstjes are mentioned. The book is called "A Day on Skates" by Hilda van Stockum. I've posted the details on the Dutch Reading page under Children's Books. but here's the part where the korstjes come in. Read for yourself!

"As time went on more and more people came out on the ice, and here and there tents were being erected. Some of these tents had benches in front of them on which tired skaters could rest. There was also the smell of delicious hot cocoa and wafers, with one man calling from a tent door:

"Hot milk and cold cake:
 Sit down to partake."

"Yes, yes, let's," cried Afke. She was hungry, and besides her legs were getting shaky. Some of the boys and girls now complained that their skates were coming loose, so Teacher picked out a nice clean-looking tent and ordered them all to stop. This they did gladly, with a great scraping of skates, and falling onto the wooden benches, they looked at the food on the table with hungry eyes. A fat lady served them, smiling good-naturedly as she lifted the lid from a kettle of steaming cocoa. Everyone got a big cupful and a korstje, which is a little spicy Dutch cake, especially beloved by skaters. They munched, and warmed their hands on the hot cups, while Teacher lit his pipe and puffed away. "

Call it a sign, but with today's snow, the book and the korstjes, I decided it was high time to dig out a recipe, make myself a cup of hot chocolate and curl up on that couch! The dough needs to rest a day, so plan ahead.

Korstjes
1/3 cup and 1 tablespoon water (80 ml)
1 cup honey (300 grms)
2 1/2 cup rye flour (350 grms)
1/2 teaspoon kosher salt (3 grms)
2  heaping tablespoons ground anise (15 grms)
Pinch of cinnamon (optional)
1 scant tablespoon baking powder (12 grms), double acting

1 small egg, beaten

Heat the water and the honey in a small pan. In the meantime, put the dough hooks on the mixer, or prepare to use your muscles, and add all the dry ingredients to the bowl. 

Mix the warm honey with the dry ingredients, until it comes together into a smooth dough. The dough  will be runny at first, but as the honey cools, it will set up into a putty-type texture, so try to have everything mixed before it cools, as this will put a strain on your motor/arms. Cover, and rest it overnight in the fridge. Take it out to bring to room temperature about two hours before you get ready to bake.

Dust the counter with a little bit of flour and roll the dough out into a square, approximately 10 x 10 inches (25 x 25 cm), and about 3/8th inch high (10mm). Cut the dough into three equal strips, and then make marks on the strips every inch or so, but don't cut all the way through the dough. 

Brush the dough with the beaten egg and bake on a silicone mat on, or a parchment covered, baking sheet in a 400F/200C oven in about 15 minutes, or until they're nicely browned. 

After they've cooled, you can break each of the pieces off into individual servings. 

Makes approximately 28 - 30 korstjes. Recipe adapted from Cees Holtkamp's book "Koekje".


Amazon Prime Shopping Suggestions: 

Disclaimer: if you buy through any of the links in the Amazon Prime Shopping Suggestions section, the Amazon Services LLC Associates Program will pay us a small commission on qualifying purchases. It does not increase your cost or price, and it will help us keep the website running. Your support is very much appreciated! 

Don't have Amazon Prime but want to give it a try? This link offers a 30 day trial. 


Pindarotsjes

It's the simple things that make life extra special. I was reminded of that again today when I kicked back with a cup of rooibos tea and a stack of Christmas cards, after working on today's recipe, pindarotsjes, chocolate covered peanut clusters. For a great snack, gift or little treat, all it takes is a handful of roasted peanuts, and a bit of chocolate. And patience, mind you, but it's worth the effort, and they make for a great gift. 

I tried to find out when peanuts first came to the Netherlands, but I was unable to find any specific information. The earliest reference I was able to find was in a book from 1866, where the author, Albert Helman, called them "olienootjes", oil nuts, which is a term I heard from the older generation when I was growing up. 

Nowadays we call them "pindas", and boy do we love them! A sandwich with peanut butter (with hagelslag!) is a kid's staple, the equivalent of the American peanut butter and jelly, and we love our French fries with a generous serving of hot peanut sauce. But even earlier than that, peanuts showed up on our collective tables in the form of confectionary. Pralines, toffee and candy bars, all made with peanuts, were very popular, as you can see here in an advertisement from Jamin from 1921, proudly announcing "Peanut Week", and offering a variety of peanut confections for purchase. 

The chocolate confection I made today is called "pindarotsjes". Its name literally translates to "little peanut rocks" and I can't say the imagery is amiss. A small handful of roasted peanuts is folded into tempered chocolate and set aside to harden. You can imagine that this must have been a special treat (and the most expensive one in Jamin's Pinda-Week!). 

Tempering chocolate is not difficult, but it takes a bit of patience, and a steady eye on the temperature. You will need a digital thermometer or candy thermometer to keep track of the temperatures, a bowl for melting and mixing, and a small ice cream scoop (#40) or a couple of spoons to form the treats. I've added some suggestions at the bottom of this post, in case you're looking to expand your kitchen supplies! 

If you heat chocolate too high, it will not set and you will end up with a sticky, gooey chocolate mess. If that happens, I would suggest to blend the whole thing into a paste, and use it on toast. But if you can muster the courage, I would highly recommend trying to master the technique, as it produces beautiful, shiny, snappy chocolate. 

And if you don't like peanuts or dark chocolate, not to worry. This can also be made with almonds, hazelnuts, or even a mix of nuts and dried fruits, as well as with milk or white chocolate - just make sure they're good quality chocolate, with cacao butter. 

Pindarotsjes

10 oz (300 grms) roasted, unsalted peanuts (or any other nut or nut combo you like)

15 oz (450 grms) dark chocolate, chopped and divided

Carefully melt 10 oz (300 grms) of the dark chocolate. You can do this either over a bowl of warm water (make sure no steam or water comes near the chocolate because it will seize up), or at short 30 second intervals in the microwave, stirring regularly. Keep your eye on the temperature of the chocolate but don't let it go above 120F/49C for dark, 115F/46C for milk and 110F/43C for white chocolate. 

Let the chocolate cool down to 82F/28C for dark, 80F/27C for milk, and 78F/26C for white, while stirring gently but frequently - stirring is an important step for the crystals to do their thing. While it cools, cover a baking sheet, or large cutting board with a piece of parchment paper and get your ice cream scoop ready. You can also use a couple of spoons.

When the chocolate has cooled down enough, add the remaining chocolate into the bowl and stir it in. We are going to bring the temperature up to 90F/32C (dark), 86F/30C for milk, 82F/28C for white, the same way you melted the chocolate before. Remember that this time we are only going to bring it up a little bit so use your digital thermometer to keep track! 

When you've reached the intended heat, fold the nuts into the chocolate making sure they're well covered, and scoop out servings onto the parchment paper. You have to work quickly, because the chocolate will set rapidly. 

Once you've scooped all the peanut clusters onto the paper, set it aside to harden. Just at room temperature, or in a cool area of the house, it won't take long to set. The hard part is going to be trying to hide them from the rest of the family ;-)

Makes approximately 24 pieces. 


Amazon Prime Shopping Suggestions: 

Disclaimer: if you buy through any of the links in the Amazon Prime Shopping Suggestions section, the Amazon Services LLC Associates Program will pay us a small commission on qualifying purchases. It does not increase your cost or price, and it will help us keep the website running. Your support is very much appreciated! 

Don't have Amazon Prime but want to give it a try? This link offers a 30 day trial. 


Kruidnoten Arretje's Cake

The combination of kruidnoten and chocolate is a winning one - and one that has not gone unnoticed by the Sinterklaas-focused food industry. You can buy chocolate (milk, white and dark) covered kruidnoten, chocolate letters and bars with chunks of kruidnoten, chocolate cheesecake with kruidnoten, kruidnoten tiramisu, and even whole kruidnoten chocolate pies. I am waiting for the kruidnoten chocolate body wash - you know it won't be long now!

But, all craziness on a stick, the sweetness and creamy mouthfeel of a good chocolate does combine really well with the flavorful spices and crunchiness of the kruidnoot, which is why today's recipe is such a no-brainer. For one, it is easy to make, and secondly, there is no need to use the oven so you will not be getting in anybody's way. Yay on both counts!

Kruidnoten are a crunchy little cookie associated with the Sinterklaas period. Arretje's cake is a no-bake chocolate cake that was popularized in the Dutch kitchen because of its easy preparation. Follow the links for more information!

Kruidnoten Arretje's Cake

2 sticks butter (225 grms)
1 cup sugar (200 grms)
7 tablespoons unsweetened cocoa powder (40 grms)
1/4 cup heavy cream (60 ml)
2 oz good quality dark chocolate(preferably 80% or higher), chopped into small chunks (56 grms)
About 2 cups kruidnoten (about 50 - recipe in the link)*

Melt the butter, sugar, cocoa, heavy cream and dark chocolate slowly in a sauce pan, until just melted, on low to medium heat. 

Make sure all the sugar has dissolved. If you rub a little bit of the mixture between your thumb and index finger and it feels gritty, the sugar has not yet dissolved.

Take the sauce pan from the stove and let it cool a bit. In the meantime, add the kruidnoten to a bag, or fold them into a clean towel, and roll your rolling pin over the cookies several times. You are looking to break the cookies into pieces. Not too big, not too small. I left them mainly whole for this cake and found it hard to get clean slices when cutting, so will definitely break them up next time. 

When the chocolate in the pan has cooled down, fold the cookies into the chocolate paste until they're all well covered. Line a cake pan with parchment paper or plastic film, spoon the mixture into the pan and flatten it with a spatula, making sure there are no air bubbles.

Cover and refrigerate for at least four hours, or overnight. Lift the cake out of the pan, and cut into thin slices. This cake is very rich, and pairs best with a cold glass of milk, or some unsweetened tea or coffee.


*If you don't have kruidnoten, or don't have time to bake them, think about using speculaas (windmill) cookies or even stroopwafels, gingersnaps or those Lotus Biscoff cookies. As long as it's a hard cookie, it'll work great!

A creative Sinterklaas tradition!

As you know, the evening of Sinterklaas is almost upon us. December 5th is when the children receive their gifts, either straight from Sinterklaas's hand (the anxiety is almost too much!), or left behind at the front door in a big burlap sack because, you know, he's a busy man and he has so many more homes to visit! 

Dinner is often skipped, but the table will be set with coffee or tea, almond paste filled banketstaafgevulde speculaas or regular large speculaas chunks, and may even have worstenbroodjes (sausage rolls), a warm soup, huzarensalade (made with potatoes and boiled beef) or salmon salad, and other snacks. 
 
After the youngest ones have unwrapped their gifts, nibbled on kruidnoten, drank their hot chocolate and gone off to bed, the adults give their gifts to each other. And here is where it gets to be real fun! 

There are two parts to the gift: one is the surprise (pronounced "sir-PREE-suh") and the other one is the poem. The surprise part is where the giver has taken the time and dedication to build a fun and dedicated wrapping around the gift itself. Not just a piece of pretty paper and a bow, mind you, but a whole construction, sometimes even with moving parts, that hide the real gift. 

This surprise is often reflective of the receiver's hobby, interests or passion. I'll give you some examples: a bird-watcher might receive a handmade papier-maché bird, with a pair of binoculars inside, or a bird book. A fervent baker might find her gift hidden inside a cardboard cake, complete with candles. Here are some other examples I found on Pinterest:


Now, because you are probably a kind and considerate person, you would think that the swimming pool is for a dedicated swimmer, the toolbox for a gifted handyman, and the side-table disguised as a cat for a kitty-lover. Not so fast, reader! Knowing our love for ribbing others or poking fun at their misadventures, these could just as easily be containers for gifts for somebody who failed their swimming diploma for the fifth time, a toolbox for that neighbor that always borrows your tools but never gives them back, or a kitty for somebody who is highly allergic. Those among you who have experienced a Dutch Sinterklaas know what I mean!

The second part is the poem that accompanies the gift. It is usually signed by either Sint or Piet, giving certain anonymity to the writer. This is not a love poem, or a dedication to how well one's behaved over the year, but most probably a gentle fun-poking rhyme about what the surprise represents, or why the gift inside was chosen. The receiver of the gift has to read the poem out loud before opening the gift. 

For example, for the toolbox I found this one here in Dutch. I am posting the translation here: 

Everything neatly together 

A job here, a job there, 
you get to work and it's done. 
But sometimes you have lost the hammer 
and then it takes extra time. 
Or you can no longer find the pliers. 
It is difficult to tie it around your neck! 
Saint hears you cursing under your breath, 
because you're tired of searching! 
So, if you didn't know yet you get a tool box! 
Everything is neatly arranged from now on. 
From combination pliers to earth leakage circuit breaker.

Best,
Sint
 

Of course, this rhymes in Dutch! As you can imagine, the more the evening advances, the more fun is to be had. It is wonderful to see how much dedication and attention people have put into finding that one gift, making the decorations and writing the poem. Aside from the gentle fun-poking, it shows real care and love for the person who the gift was for. It's always nice to get a gift, but it is double so nice if every single detail about it is well-thought out.

If you haven't done gift-giving the Dutch way, maybe this year is a good year to start a new tradition! 


Pannenkoekentaart

It's interesting to see how traditions start out, and how they become engrained in national culture as soon as people run with it. Like this one, for example. On November 29th, many of us celebrate Sint Pannekoek, Saint Pancake. It started out as the brainchild of Jan Kruis, a writer and cartoonist. The story of Saint Pancake first made an appearance in a cartoon episode of the famous Jan, Jans en de kinderen (Jack, Jacky and the Juniors) in 1983, in Libelle magazine. 

Here's how it happened. In the cartoon, Grandpa Gert is staying for dinner, and, while they're cleaning the green beans, granddaughter Catootje confides in him that she doesn't really like beans, but that she loves pancakes. Cunningly, grandpa Gert (Jan's dad) asks Jans what the date is. When she says November 29th, Grandpa proudly proclaims that it's Saint Pancake day! 

According to him, it's an old Rotterdam tradition that they used to celebrate each year when Jan was still a boy at home. Jans exclaims that she loves old traditions and hurries back to the kitchen to start baking a pile of pancakes to surprise her husband. In the meantime, grandpa and Catootje rejoice because the plan succeeded: they are going to have pancakes for dinner instead of green beans! 

Grandpa then explains that, in order to celebrate the tradition correctly, each member of the family places a pancake on their head when the head and exclaims joyfully : "We wish you a happy and blessed Saint Pancake!".

Jan, coming home from work and never having heard from this made-up tradition, wonders if his whole family has gone mad. 

The cartoon has always had a great following, and it wasn't surprising that this new "tradition" was quickly adopted by its fans, and has since become a national movement! People meet up, put the first pancake on their head to wish each other a happy and blessed Saint Pancake day, take pictures and have a grand ole time.  And why not? 

As you know, pancakes are one of our favorite things to eat. Not the American thick fluffy pancakes, but flat, thin pancakes as big as your biggest frying pan, that you can sprinkle with powdered sugar, or smear with butter and jam, or apple syrup, or bake with apple and/or bacon. And we don't have just one pancake celebration day, but two! The other one is on a Friday in March. And of course, we also serve pancakes with split pea soup!

For today, we baked a pannenkoekentaart, a cake made of pancakes, for dessert, and used the remaining batter to bake a small pancake for our head :-). Sweet versions like this one are popular for dessert, filled with jam or fresh fruit. Savory ones can be eaten for dinner warm, where you layer them with caramelized onion, cheese or bacon.

Pannenkoekentaart
2 cups (250 grams) flour
1/2 teaspoon kosher salt
2 eggs
2 1/2 cups (500 ml) milk
2 tablespoons (30 grms) butter, melted and room temperature
1 tablespoon (15 gms) butter for the frying pan

For the topping:
Flavored fruit yoghurt (I prefer skyr, if you can find it), fresh fruit.

Mix the flour and half of the milk together, whisking out the lumps. Mix in the eggs, then the rest of the milk, the salt and the melted butter, and give it a good whisk to blend it all together. Cover and set aside for 20 minutes. 

Heat the tablespoon of butter in a non-stick pan at medium heat. Pour in 3/4 cup of batter (depends a bit on the size of your pan, mine is an 8 inch) and swirl the pan so that the batter spreads thinly over the whole bottom of the pan. Bake one side for about 2 minutes, then flip over until both sides are golden. Stack them, as you bake them, on a plate. 

When they've cooled down, place the first pancake on the bottom. Slather a thin layer of fruit yoghurt or skyr and fresh berries in between and top with the next pancake. Repeat. At the top, dress with dollops of yogurt, add the rest of the fruit and sprinkle with powdered sugar. Refrigerate until serving. Slice wedges, like a pie, out of the cake. You can also try Nutella with fresh bananas, cherry yogurt with canned cherries, etc etc. Makes about 14 medium size pancakes: 10 for the cake, and four for your head ;-).

Happy and blessed Saint Pancake Day! 


It's also fun to do this for a kid's party: make plenty of smaller pancakes, lay out a table with different kinds of toppings, and have the kids make their own pancake cake. In that case, five small pancakes per kid should suffice.