Showing posts sorted by date for query -+최신해커주식DB문의☑️✔️|(텔레 DBchance}ㅡ|◀해커로또디비문의ㅡ_. Sort by relevance Show all posts

Mandarijnentoetje

Cornstarch, or maïzena in Dutch, has a long history in the Dutch kitchen. Its arrival in the Netherlands dates back to the 19th century, around the same time that cornstarch became popular in other parts of Europe. The brand name Maizena was introduced in the United States in 1862 by the Duryea brothers and less than a year later the product was already available on the Dutch market, and winning medals at the London and Hamburg expositions.

Maïzena was recommended, among other things, for the weak and those with stomach problems. Cornstarch was an innovation over traditional thickeners like flour, which needed to be cooked longer to achieve the right consistency.

In Dutch cuisine, maïzena is primarily used to thicken sauces, soups, and gravies, and it’s also essential in making some traditional desserts, such as vla (a creamy Dutch custard) or today's dessert. It can also be used in baking, often as a part of the mixture for cakes or pastries, contributing to a tender crumb, like in slagroomtaart, our typical birthday cake.


Advertisement from Opregte Haarlemsche Courant

2 January1864

What I love especially is how quick a dessert comes together, like today's mandarijnenpudding. This is a safeguard against unexpected and last-minute guests, and you probably have all the necessary ingredients at hand. If you don't like mandarin oranges, you can use canned peach instead, or fresh raspberries or strawberries. If you prefer Nilla cookies over ladyfingers, use those - these desserts are easy to make your own and create new family favorites! Makes six medium, or four large servings.

Mandarijnenpudding

1 11 oz (315 grams) mandarin oranges, in light syrup
2 cups (475 ml) milk
1/2 cup (60 grams) cornstarch
3/4 cup (120 grams) sugar
Zest from 1 fresh mandarin orange, divided
12 ladyfingers 

1 cup whipping cream
1 heaping Tablespoon powdered sugar

Drain the can of mandarin oranges, but keep the juice. Keep 6 pretty mandarin slices aside, and coarsely chop the rest. Add enough milk to the juice to make it to 3 cups (750 ml). In a heavy-bottomed saucepan, pour in the milk and the sugar. Use a few tablespoons of the milk to make a paste out of the cornstarch. In the meantime, bring the milk up to a low simmer, and stir the cornstarch back into the pan. Keep stirring until the liquid thickens, about five minutes. Take off the stove, and fold the chopped mandarin slices in. Put it back on the stove, and stir until it's incorporated, then remove off the heat. Stir in half of the mandarin zest and set aside to cool. Break up 6 of the ladyfingers into small, bitesize pieces and divide over 6 glasses. When the pudding is cooled down enough, divide over six glasses or cups. Cover with plastic film to avoid skin forming, and put the vessels in the fridge until you are ready to use. 

Right before serving, whip the cream with the powdered sugar. Pipe the whipping cream, or use a spoon to make a big dollop on top, and decorate with a slice of mandarin orange, a ladyfinger, and the remaining zest. 


Stamppot

Stamppot is the ultimate Dutch comfort food—a hearty, rustic dish that has been a staple of Dutch kitchens for centuries. The name stamppot literally means "mashed pot," and it perfectly describes the process of mashing vegetables together with potatoes to create a warm, filling meal. It also uses affordable, easily accessible ingredients - how Dutch is that! It’s a one-pot dish, simple yet deeply satisfying, especially on cold days.

Stamppot isn’t just food; it’s part of our Dutch heritage, it's in our genes. As soon as the cold weather hits, the cravings for stamppot explode. It evokes memories of cozy family dinners and the comforting flavors of home. It’s a dish that connects generations and reflects the down-to-earth, practical nature of Dutch cuisine. 

It’s a dish we’re often teased about, as though our only contribution to global cuisine is a humble plate of mashed potatoes with vegetables. But if you’ve been following this website for a while, you know that’s far from the truth—Dutch cuisine has had more influence than we often care to boast about.

That said, a steaming plate of stamppot may not be earning Michelin stars anytime soon… but it will win the hearts of everyone you serve it to. I have yet to meet anyone who’s turned up their nose at our beloved stamppots!

The mashed vegetables are often root vegetables (carrots, onions) or greens (kale, cabbage, endive) and stamppot is traditionally served with smoked sausage (rookworst), bacon or crispy bacon bits, meatballs and gravy, and even a fried egg on top! But it doesn't have to be meat: crispy tofu, fish sticks, dried fruit, or a handful of cashew nuts are often used as substitutes for meat. While stamppot made with potatoes is a beloved classic, modern variations often include creative ingredients like sweet potatoes, roasted garlic, or even vegan options with plant-based sausages.

The most common varieties of stamppot, with a link to the recipes, are:

  • Boerenkool Stamppot: made with kale and potatoes, often regarded as the most traditional version, and still the favorite of all stamppots.
  • Hutspot: a mix of potatoes, carrots, and onions—legend has it this dish dates back to the Siege of Leiden in 1574!
  • Andijviestamppot: raw endive is mixed in for a slightly bitter and fresh flavor.
  • Zuurkool stamppot: sauerkraut adds a tangy twist to the dish. (This is a keto version with cauliflower)
  • Rodekoolstamppot: stewed red cabbage with apples are mashed into hot, fluffy potatoes.
  • Spruitjesstamppot: Brussels sprouts for a slightly bitter flavor. Together with appelmoes, apple sauce, it's a great way to start kids on the more challenging vegetables.
  • Hete Bliksem: the apples in the dish hold their heat so the dish is called "hot lightning". 

And we wouldn't want to miss out on that kuiltje, a little well in our stamppot to hold the pan gravy, to make sure that every bite is extra flavorful! 


Rode Kool Stamppot

Red cabbage, that wonderful red-almost-purple vegetable bowling ball, belongs (together with white cabbage, Savoy cabbage, and pointed head cabbage) to a variety called "sluitkool", or head cabbages. Head cabbage is a general collective name for those cabbages whose leaves are so densely packed that they more or less form a 'head'. Other types like bladkool, leaf cabbage, would be kale, boerenkool, farmer's cabbage.

In the Netherlands, cultivation traditionally takes place in North Holland. This reflects back in the names of vintage or heirloom varieties: Langedijker Allervroegtste, Langedijker Herfst, and Langedijker Bewaar. This is also where 60% of the Dutch red cabbage acreage is located, but cultivation also takes place in South Holland, Limburg, and North Brabant. 

The variety of cabbages in the Netherlands is high, and one can find several types sold at greengrocers or vegetable stores at the same time. The top ten most popular cabbage varieties are: 

  • Witte kool (white/green cabbage)
  • Rode kool (red cabbage)
  • Boerenkool (farmer's cabbage = kale)
  • Spruitjes (Brussels sprouts)
  • Bloemkool (cauliflower)
  • Savooiekool (Savoy cabbage)
  • Spitskool (pointed head cabbage)
  • Chinese kool (Chinese cabbage, Napa cabbage)
  • Paksoi
  • Broccoli

Of the head cabbages, the two types that are most easily found are the white (often called green) and the red. Both can be used raw by shredding it for salads, fermented as in zuurkool (sauerkraut) or kimchi, and in a variety of hot dishes. White/green cabbage is very flavorful as creamed cabbage, and red is great stewed with apples or pears, and a little splash of vinegar to maintain the color. 

Cabbages are also great for making a stamppot, that ultimate Dutch comfort food: mashed potatoes (or cauliflower if you're going low-carb) and vegetables. The combination of slightly salty, fluffy potatoes and the various flavors that the vegetables contribute, make each stamppot delicious. Is it pretty food? No, but it's at the heart of many as our typical, traditional winter food, like a warm embrace. 

Rodekoolstamppot pairs well with beef stews, rabbit, or pork, like slavinken. Don't feel like cooking the cabbage? There are several commercial varieties of red cabbage with apple out there which will make this dish even quicker to prepare! 

Rodekoolstamppot

2 lbs red cabbage
1 small apple
4 bay leaves
3 whole cloves
2 tablespoons red wine vinegar or apple cider vinegar
1 cinnamon stick
1 tablespoon brown sugar
1 tablespoon cornstarch

2 lbs potatoes
2 tablespoons butter

Peel the outer, tough leaves off the cabbage. Cut the cabbage in half, then each half in half again. This will give you an easy opportunity to cut out the core which is tough and bitter. Slice each quarter into thin strips. Rinse the cabbage and add to a pan with a heavy bottom. 

Add enough water to cover the cabbage about halfway, and set it on the stove. Add the bay leaves and cinnamon stick, cover and bring to a slow boil. Stir in the vinegar, add the sugar, stir and cover again. Turn down the heat to a simmer. Let it slowly braise on the back of the stove, for a good half hour.

In the meantime, peel, core and quarter your apple. Stick the three cloves in the largest piece of apple before adding them to the pan, and slowly simmer until the apple is soft. Remove the cabbage and apple from the pan until you only have the braising liquid left. Fish out the bay leaves and the cinnamon stick, and pick the cloves off the apple. 

Make a slurry with the cornstarch (one tablespoon of water to one tablespoon cornstarch). Bring the cooking liquid back up to a boil, and stir in the slurry. At first it will color the liquid pink but as the cornstarch absorbs the water, it will clear up. Continue to stir until the sauce has thickened.  Add the cabbage and apple mix back into the pan, stir a couple of times to mix the sauce with the vegetables and turn off the heat. Taste, adjust with salt and pepper. If you like it sweeter or tangier, add a bit more sugar or vinegar. 

Set the red cabbage aside to cool. Peel the potatoes, quarter them and boil them until they're cooked. Drain the potatoes, but reserve 1/4 cup (60 ml) cooking water. Turn the heat to low, and put the pan back on the stove. Add the red cabbage to the potatoes (maybe drain first if you have a lot of liquid). Mash the potatoes together with the red cabbage. If the stamppot is too dry, stir in a tablespoon of cooking liquid at a time. End with folding in the two tablespoons of butter. Taste and adjust the seasonings to your liking. 

Serve hot.  


Bloemkoolgratin

We're still in the clutches of winter, and the need for comfort food is high. I am starting to get the garden ready, doing an initial and careful cleanup from last season's growth, careful not to bother any sleeping bees, bugs, or other beneficial critters. After spending a couple of hours outside (there is always something to do!) I long to come inside where it's warm and cozy. There is something special about that tingle in your hands and cheeks, when the skin is adjusting to different temperatures! 

One of the dishes that often appears on the table during this time is vegetable gratins, like today's dish. Sometimes they're made from scratch, but most often they are made with the potatoes, meat, and vegetables that were left over from the day before. Being wasteful with food is not in our DNA, and making new dishes out of, if you will, leftovers, is practically an unclaimed national sport!  

Boiled, braised, or steamed vegetables are arranged in an oven dish, sometimes over slices of boiled potato, sometimes with browned ground beef or no meat at all, and covered with a coat of breadcrumbs and butter. If the food is already heated up, like today's, it only takes about a ten to fifteen minutes to get the gratin crispy and golden, just time enough to set the table. If everything is cold, it may take up to 30 minutes. In that case you may want to cover the gratin for the last ten minutes so that it doesn't burn. 

Bloemkoolgratin

2 lbs (1 kg) cauliflower, rinsed and broken into florets
5 cups water
1 teaspoon salt

For the sauce
4 tablespoons (50 grams) butter
1/3 cup (50 grams) flour*
2 cups (500 ml) milk or cooking liquid
1 cup (113 grams) cheese**, shredded
Salt, white pepper, nutmeg

For the gratin
1/2 cup breadcrumbs or Panko. 
4 tablespoons (55 grams) butter, divided

Bring the water to a boil, salt, and add the cauliflower. Boil at medium heat for about fifteen minutes, then check to see if the texture is to your liking: the longer you cook it, the softer it gets. 

When it's the right texture, drain the cauliflower, but save the water, and measure out two cups (500 ml). (Don't discard the rest of the cooking water if you are planning on making soup with the leftovers). Put the empty cooking pot back on the stove, and in it, melt the butter (do not brown) for the sauce. With a wooden spoon, stir in the flour until the two have come together as a paste, and slowly add the two cups of milk or cooking liquid, while stirring. Keep stirring until the lumps are gone and the sauce has thickened and is hot. Fold in half of the cheese. Bring up to taste with salt and pepper and if desired, a pinch of nutmeg. 

Add the cauliflower back into the pot with the sauce, stir once or twice so that the vegetable is covered with the sauce. 

Heat the oven to 375F/190C. Butter a baking dish (8 x 11 inches/20 x 28 cm) with a little bit of the butter for the gratin, and pour in the hot cauliflower. Give the baking dish one or two shakes so that the contents distribute evenly over the dish. Mix the breadcrumbs with the rest of the cheese, and sprinkle it over the cauliflower. Cut the rest of the butter in small pats or strips and place them strategically on the breadcrumbs. Set the baking dish on the middle rack of the hot oven, and bake for ten to twelve minutes, or until the butter has melted and the breadcrumbs are golden. If you want, you can finish the dish under the broiler during the last minute or so - the melted butter will brown the breadcrumbs nicely - but do not walk away as it will burn quickly. 

Serve with boiled potatoes and gehaktballen, meatballs, or braadworst, bratwurst. A side of appelmoes, applesauce, is also tasty. This dish lends itself perfectly for a typical Dutch practice: prakken. :-)


*If you would rather not use flour, use cornstarch to make a slurry and bind the sauce.
** Use a sharp cheese, like mature cheddar, Gouda or pepperjack cheese. 

Speculaaskruiden

Speculaaskruiden, speculaas spice mix, are a traditional Dutch spice mix used to make our famous speculaas cookies, a traditional treat during the year with a cup of coffee or tea, or as a bread topping (don't judge! LOL). Speculaaskruiden are also widely used during the winter months, especially around Sinterklaas celebrations and the holiday season for other types of bakes. 

Its warm and aromatic blend reflects centuries of Dutch culinary tradition and trade history. The origins of speculaaskruiden are a product of the spice trade that flourished in the Netherlands during the Golden Age (17th century). Dutch merchants through the Dutch East India Company (VOC), brought spices like cinnamon, cloves, nutmeg, and ginger from Asia. These exotic spices became integral to Dutch baking, particularly for festive treats as they are fairly expensive, either on their own, or combined in a speculaaskruidenmix.  

Speculaaskruiden are a blend of warming spices, with recipes varying slightly depending on personal preferences. The basic composition includes: cinnamon (the dominant flavor), cloves, nutmeg, mace, ginger, and sometimes cardamom and/or white pepper. Cinnamon constitutes the largest portion, giving the mix its characteristic sweet warmth. Some will use anise or coriander. 

While speculaaskruiden are best known for their role in speculaas bakes, such as gevulde speculaas, and speculaascake, it is versatile enough to also be used in other dishes and treats. Try a pinch of it in your coffee, tea, or hot chocolate, in oatmeal, in pancakes, or mixed in with butter for a sweet, buttery spread on your breakfast toast. You can also add a pinch to beef stews, meat pies, or roasted vegetables, such as butternut squash. 

Here’s a simple recipe for making your own speculaaskruiden blend at home. The proportions can be adjusted to suit your taste, but this version offers a balanced, traditional flavor. Having said that, everybody has a different preference. You may want to make a small quantity first (maybe 1 Tbsp cinnamon and 1/4 teaspoon cloves, nutmeg, mace, and ginger, and 1/8 tsp cardamom and white pepper), and use it in a cookie recipe to see if you like the taste. It's easier to adjust and get exactly the taste you want. 

Can't be bothered or don't have the time? Amazon also sells speculaaskruiden, but we haven't tested them to see if the flavor gets close. When in a pinch, you could also use pumpkin pie spice or apple pie spice. Read the ingredients list on each and adjust accordingly.

Homemade Speculaaskruiden Recipe

4 tbsp ground cinnamon
1 tbsp ground cloves
1 tbsp ground nutmeg
1 tsp ground mace
1 tsp ground ginger
1/2 tsp ground cardamom
1/2 tsp ground white pepper (optional, for a mild kick)

Measure out all the spices into a small mixing bowl. Mix thoroughly to combine, ensuring there are no clumps. Store the blend in an airtight jar or container in a cool, dry place. It will keep its potency for up to 6 months.

Photo by Wouter Supardi Salari on Unsplash

Appelepap

Every now and then, I get down these rabbit trails that lead me to new and amazing discoveries. Today was one of those days, and I found not one, but two gems! Lately, I've been scouring books and magazines for additional apple recipes. My trees really put out a great crop this year, and I hate seeing food to go waste. 

While I was browsing the online inventory of the DBNL, the Digital Library for Dutch Literature, I ended up stumbling across a book called "Karel Knal en de wonderschoenen" from 1943, written by C.H. Geudeker and Herman Looman, and delicously illustrated by Uschi.  I got lost a little bit in the story about this young man, Carl, who wants to become an athlete while donning an interesting choice of footwear. In the story, he tells his coach that he wants to participate in every single race, to which his coach responds: "Je hebt bovendien nog nooit een 100 meter gelopen en een race over 10 kilometer evenmin. Ik kan je verzekeren, dat het geen van beide appelepap is!" ("Moreover, you have never run a 100 meters nor a 10 kilometer race. I can assure you that neither of them is apple porridge!")

A drawing of a young athlete
Hold on a second! Appelepap? Apple porridge? What is this appelepap? I did some more digging, so let me tell you. Appelepap is/are two things: one, it's an expression used to describe something that is easy to do. Secondly, and far more interesting for all of us, it's an old-fashioned traditional Dutch dish, specifically from the province of Gelderland, eaten either as a hearty breakfast, or a dessert. Who knew? It appears to have been, or may still be, particularly popular in rural areas, where simple, hearty dishes were commonly made from ingredients readily available, like apples and dairy.

This particular version is made with apples, buttermilk, and a pinch of cinnamon, which creates a tasty combination of sweet and (slightly) sour - delicious! There are other versions that use milk (or you could use a nut milk), a handful of raisins, and flavored with a dusting of ground anise. I tried several combinations and, although a fan of anise, I liked the apple-buttermilk-cinnamon one the best. If you don't like or can eat apples, try it with pears (perepap) or cherries (kersepap). If you don't have buttermilk, make your own with one cup of regular milk and a tablespoon of vinegar: just stir and let it sit for five minutes until it starts to coagulate. And if you don't have fresh apples, just use canned apple sauce - it's all good! 

Appelepap

2 medium size apples (about 400 grams), peeled and cored
4 cups (1 liter) buttermilk
3/4 cup (100 gram) flour
1 Tablespoon sugar/honey/sugar substitute (optional)
1/4 teaspoon ground cinnamon

Dice the apples, set two tablespoons of chopped apple aside, and add the rest to a saucepan with a little water. Bring up to a boil and cook into a chunky applesauce. In the meantime, mix the flour and the buttermilk together until there are no lumps. Stir in the buttermilk mixture with the warm applesauce in the pan and continue to stir, bringing it to a simmer. Don't let the buttermilk boil as it will curdle, so just keep stirring on low to medium heat for a good five minutes, or until the flour has thickened the porridge. When it's hot, take it off the stove and divide the porridge over four bowls. Split the remaining chopped apple over the porridge, and dust a little cinnamon over each bowl. Eat warm or cold. 


Drie-in-de-pan (met appel en rozijnen)

Drie-in-de-pan, three-in-the-pan, is a traditional Dutch dessert dish but to my shame I have to admit that I don't remember ever eating it. At first glance, they just looked like small pancakes, so in my overly practical mind I figured if I was making pancakes, I might as well make the big, cartwheel ones, and not mess around with making three little ones. Am I alone in this? 

Last night, looking through my cookbooks for apple recipes, I came across them again, tucked in between pannekoeken en wentelteefjes. It wasn't necessarily the recipe itself that drew me in, but a handwritten comment scribbled in the sideline by a former owner that said: "platte oliebol". Wait, what? Flat oliebol? Now you have my attention! I looked at the recipe again, and realized that the commenter was right: the batter had all the ingredients for oliebollen: flour, yeast, milk, and eggs. Well, fair enough, so do many other foods - so I decided to find out. 

Of course, I can't just follow instructions so I added chopped apple, raisins, and cinnamon to the recipe, but I think I'm sold. Although they are not as fluffy as oliebollen are on the inside, they are also much less greasy, which I guess is a good thing. 

These pancakes are thicker and heartier than regular Dutch pancakes and have a crispy exterior with a soft, fluffy inside. Drie-in-de-pan, so called because you make three at a time in the same pan, can be enjoyed as a sweet treat, usually served with powdered sugar, syrup, or even jam, but it can also be made with savory fillings (think ham and cheese, or bacon and cheese, or roasted vegetables, for example) for a hearty lunch or brunch. 

Now...don't get hung up on the number 3. If your pan is bigger and you can fit five, go for it. Call it Vijf-in-de-pan! Don't like apples and/or raisins? Try bananas instead, or just leave the fruit out altogether. There's no judgment here, just adjust the recipe to your liking. And if you don't eat them all, they freeze well and can be heated in the toaster. 

For portioning out the batter, I use an ice cream scoop about 2.5 inches (about 6 cm-ish) across that holds approx. 80 ml or 1/3 cup. I don't peel the apple because I like the red skin to shine through, but feel free to peel if you prefer. 

Makes approx. 8-9 little pancakes.

Drie-in-de-pan

1 3/4 cup (250 grams) flour
1/2 tsp salt
2 tsp (5 grams) active dry yeast
1 cup (250 ml) milk, warm 
Pinch of cinnamon
1 Tablespoon sugar, optional
2 eggs
1/2 cup (50 grams) raisins
1 medium (5 oz/150 grams) apple

Butter for frying
Powdered sugar for dusting, optional

Mix the flour, salt, yeast, milk, and cinnamon in a bowl. Add sugar if using. Stir in the eggs and the raisins. Core the apple and chop into small pieces, and stir it into the batter, then cover the bowl and let it rest for 30 minutes so that the yeast can do its work. 

Heat the butter in the pan and scoop the batter in equal amounts into the pan. Fry one side for about 3 to 4 minutes, or until it's golden brown, then flip over with a spatula and fry the other side. Keep them warm on a side plate under a towel or pan lid while you fry the others. 

Dust with powdered sugar just before serving (optional), and eat warm. These are also great topped with jam. 


Brusselse Appeltjes

It's apple season! I've already been dehydrating apple slices, and have just about finished canning my yearly stash of appelmoes. I've also baked and frozen 5 Dutch appeltaarten, made an apple cake, and took appelflappen over to my sweet neighbors.  To say I'm about "appled" out, is not an exaggeration, but I know better than to complain. This winter, when I add a heaping spoon of appelmoes to my dinner plate, or enjoy a slice of apple pie with my Sunday coffee, I will be grateful and happy that I did the work. 

Nevertheless, when a freak rain storm last night knocked more apples off the tree, I slightly despaired. Now what? Time is in short demand during the week, but these apples needed something doing with. I dug through my old cookbooks and my eye fell on a recipe name I had not seen before: Brusselse Appeltjes, apples from Brussels, or made the Brussels way.  

Now, I know Brusselse wafels, and I know Brussels sprouts (spruitjes) and Brussels lof (witlof), but Brussels apples were new to me. After digging around the internet (and going down a myriad of rabbit holes, goodbye time!) I found out that the recipe has been around in the Netherlands since approximately around the middle of last century, but that it does not have a Belgian origin, or is even known in Brussels or surroundings. 

Never mind, let's try it out! Brusselse appeltjes are fresh apples, cored and filled with jam, and baked under a blanket of choux pastry....what's not to like? And the good thing is that, since it's not a traditional recipe in that sense, you can experiment all you want. Don't like jam? Fill the apples with boerenjongens, or a walnut/brown sugar/cinnamon filling, or go for almond paste. You can then rename the dish and replace Brusselse with your own name and make it a new family favorite! 

Not particularly fond of choux pastry, or can't be bothered to make it? Then try your hand at these custard covered apples, appeltjes onder de deken, instead. 

For this recipe, I chose not to peel the apples, but that's because I wasn't sure if these apples were good for baking and I didn't dare go back on the internet to check. I believe they're Winesap (the squirrels took off with the tag, so it's a bit of a guess) but Braeburns, Jonathan, Fuji, Gala, and Granny Smith are all baking apples and can do with peeling, if you're not fond of peels.

Brusselse Appeltjes 

4 medium size baking apples
2 Tablespoons lemon juice (optional, if peeling the apples)
2 Tablespoons jam* (strawberry, cherry, apricot...you pick)
4 Tablespoons (50 grams) butter and a bit more for greasing the pan 
1/2 cup (120 ml) milk or water
1/2 heaping cup (60 grams) powdered sugar
Pinch of salt, if butter is unsalted
1/3 cup (50 grams) all-purpose flour
2 medium eggs

Optional: 1 Tablespoon powdered sugar and a pinch of cinnamon to dust the dish with right before serving

Peel the apples and sprinkle with lemon juice to prevent browning, or leave unpeeled. Core. Butter the
oven dish. Place apples in the dish and divide the jam* over the four holes.
Heat the oven to 400F/200C.

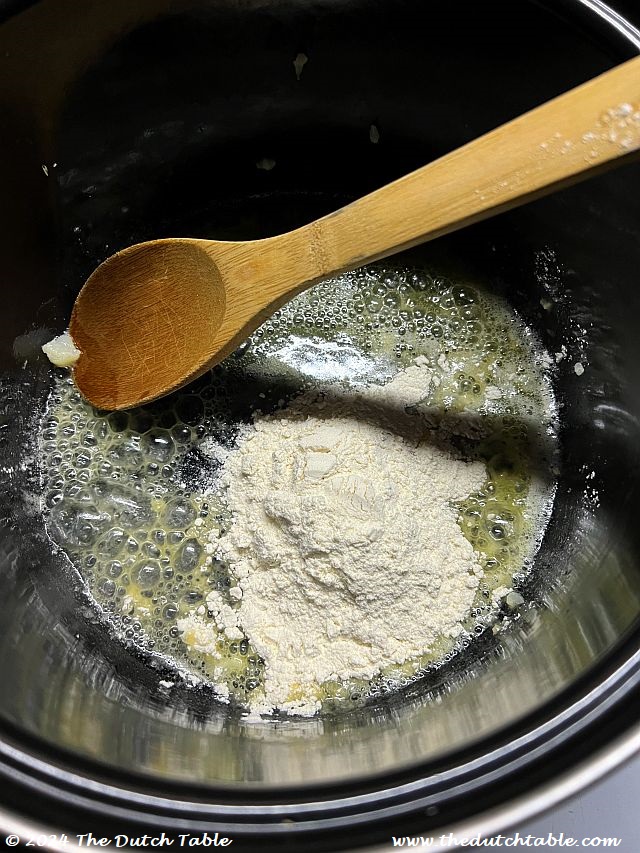
To a saucepan, add the butter, milk or water, the sugar and the salt if using. Bring to a simmer, and stir until the butter is melted. Lower the heat, dump all the flour in at once, and stir until it becomes a ball of flour that lets go of the sides of the pan. Take the pan off the heat, and stir in one egg, until it's absorbed into the dough. Add the second egg, keep stirring until it all comes together. 

Pour the dough over the apples, and place the dish in the oven. Depending on how shallow your dish is, you may want to place it on a baking sheet in case something bubbles over. Bake for 35 - 40 minutes, then check to see if the dough is golden. If yes, remove from the oven. If not, give it a few more minutes. 

Sprinkle powdered sugar with a pinch of cinnamon over the top. Serve warm. Great with a scoop of ice cream! 


*if you don't have or like jam, try boerenjongens, or a mixture of walnuts/brown sugar/cinnamon, or almond paste.


Rozijnenbroodschoteltje met appel

Several weeks ago, I made a batch of raisin bread, rozijnenbrood, to enjoy, give away, and store for later use. Raisins and currants have the tendency to absorb moisture from the bread, so after a few days the bread tends to get a little dry. Fortunately, it toasts well, and there is a certain bliss in having a warm, toasted slice of raisin or currant bread, with a little bit of "good" butter, spread across the top, and if so desired, a slice or two of aged cheese. There is little less that comforts the soul on a blistery, cold day like today! 

There are also other ways of using up old bread, like in today's dish: a bread pudding, or broodschoteltje (bread dish), made with raisin bread, apple, eggs, milk and sugar. In my search of traditional recipes, I frequently come across dishes that use up "restjes", leftovers, from the previous day. Any meat left from the Sunday dinner will be served as a cold cut, in a huzarensalade, or turned into croquettes the next day. Vegetables are repurposed into salads or soups, and bread is turned into wentelteefjes (French toast) or broodschoteltjes. From having lived in other countries and among other cultures, I know that this is not unique to the Dutch, but I do think that we take a particular pride in being thrifty, or zuinig

And we have plenty of sayings to support being thrifty: in Limburg they say "dae twieë zwegelkes noeëdig heet um zien piêp aan te staeke, weurtj noeëts riêk" (he who needs two matches to light his pipe, will never be rich), in de Achterhoek it's said that "dunne plekskes sniën, is ' t behold van de wörste" (cutting thin slices preserves the sausages), and in Zeeland, "oans bin zunig" (we are thrifty). This last one even inspired various margarine commercials in the 80s.

Well, I'm not from Zeeland, but I do like to be zuinig or deliberate in my spending, so this morning I am using up the rest of the rozijnenbrood to make a bread pudding. If you don't have rozijnenbrood, just use regular old bread and add a handful of raisins. Don't have an apple? See if you can scrounge up a pear, or use dried fruits like apricots. Even dollops of the last of the strawberry jam will make a great addition: just have fun with it! As they say in de Achterhoek: "Wa’j ow spaort veur de mond, is vake veur de katte of de hond" - what you save for your mouth, often ends up being for the cat or the dog. A great encouragement to look through the cupboards and fridge to see what can get used up, in true Dutch fashion.

Rozijnenbroodschoteltje met appel

8 thick slices raisin or regular bread (about 500 grams)
1 apple, cored and cubed
1 tablespoon (15 grams) butter
2 cups (500 ml) milk
2 eggs
1 teaspoon vanilla 
1/3 cup (65 grams) sugar
1 teaspoon cinnamon (optional)
Pinch of salt

Cut the bread into cubes and mix with the apple. Butter a casserole and add the bread and apple. In a bowl, add the milk and the eggs and beat them until all of the egg has been incorporated. Mix in the rest of the ingredients. Heat the oven to 350F/175C. In the meantime, on medium heat on the stove, warm up the milk and stir until it starts to thicken a little bit, about eight to ten minutes. Do not let the milk get to a boil, as the egg will curdle.

Pour the hot milk over the bread and apple mix. If you want a bread pudding with a crispy top, do not mix, otherwise give it a stir or two so that all the bread is covered. When the oven is up to temp, place the casserole on the middle rack, and bake it for 40-45 minutes or until golden.

Serve hot. I like to add a pat of butter or a splash of heavy cream, but it doesn't need it (then again, neither do I, but there you have it :-).


Gestoofde prei


This is going to sound so foreign to anybody who lives in Europe, but for the longest time I was unable to find prei, leeks, in the grocery store here in the US. Granted, I live in a rural area and am nowhere near a large city, but even when shopping in the capital of the state, I was not able to find any. It's only since a few years that they make an appearance, and at that still a spendy one: three stalks will near $4 easily. 

How different it is in the Netherlands! I am probably exaggerating a tiny bit, but just about anybody has a stalk or two of prei in their cart, sticking out of their shopping bag, or tucked underneath the snelbinders, those rubber straps on the rear rack of the bicycle. I did a quick search on the main Dutch grocery store website, and 2 stalks of leeks are 1 euro. One euro!!! Oh, the envy.... :-)

Prei features prominently in our cuisine: it's a key ingredient for many soups, casseroles, or as a main vegetable, like today's dish. They are considered a tasty vegetable that's valued for their fiber, nutritional content, and low-calorie profile. Not surprisingly then, leek agriculture in the Netherlands is a significant part of the country's vegetable trade, with the Netherlands being one of the key players in international leek trade alongside Belgium. 

The Netherlands produces between 90,000 and 100,000 tons of leeks per season, starting from late February or early March until the end of July or early August, ensuring a year-round availability that includes both summer and winter varieties. The main areas for leek growing is primarily in the North Brabant and Limburg regions, with more than half of this production destined for export. Well, I don't know where they're exporting it to, but it certainly isn't to my little corner of the world! 

One of the main reasons why I am so utterly pleased to finally have leeks within reach is because I absolutely love, love, love braised leeks. Because we grew up in Limburg, leeks were just about everywhere, and my grandma used to make these delicious leeks, braised in butter, with white wine and capers. It's such a simple dish, but so very satisfying! Leeks can also be served in a cream sauce, with béchamel, a cheese sauce, or sautéed with bacon. This is just one of the many ways. 

Makes four servings.

Gestoofde prei
3 large leek stalks
4 tablespoons (55 grams) butter
1 bay leaf
1 heaping tablespoon capers
1/2 cup (125 ml white wine)
1/2 cup (125 ml vegetable stock)

Cut the root ends off the leeks, and the darkest of the dark leaves at the top. (Don't discard them, but wash and slice them thin, and use them for soups, omelets or in casseroles). Cut the stalks into 3 inch pieces. Rinse under running water (if they're very sandy, cut in half lengthwise). Melt the butter in the pan, and add the leek stalks. Don't let them brown, but turn them over every two to three minutes until they start to soften a little bit. Add the bay leaf, capers, wine, and stock, bring to a simmer, turn down, cover with a fitting lid, and let them braise for about fifteen minutes. Check with a fork to make sure the leeks are tender and soft. Taste the sauce and see if you need to adjust the salt level. 


Gebakken Kaasplak

The other day, I was rummaging around in stacks of 1950's women's magazines looking for dinner ideas, as I often do. I love to see what dishes the men and women of my mom's and grandma's time prepared and ate. Sunday meals were certainly more elaborate as they appear to be nowadays, I would say, starting with a soup, then a main course (potatoes, meat and vegetables), and ending with a (dairy) dessert. Whatever was left of the meat, was frequently served the next day sliced for lunch, cold, with bread and pickles, or transformed into a new dish, often a casserole, or hot snacks like kroketten. Rice or elbow macaroni was cooked once, and a portion kept aside to turn into desserts for the next day, and vegetables that were left went into the soup, stamppots, or pan-fried until crispy. Nothing was wasted! 

On days that meat was not on the menu, I frequently saw something else in its stead: gebakken kaasplak, fried cheese slice. Recipes among the different magazines varied a little bit, so I ended up creating my own. I think it's my new favorite! 

It's a simple yet delicious dish made by breading a thick slice of cheese and frying it in butter until it's golden and crispy on the outside while remaining soft and melty inside. Pick your favorite cheese, and go for it! You can serve it as a meat substitute with dinner, as a hamburger substitute on a roll with fresh lettuce, tomato, pickles and onion, or as a snack with a dollop of mustard. 

Here in the US, cheese can be found pre-sliced, so-called deli-style. Each square is approximately 3.5 x 3.5 inches (8.5 x 8.5 cm), and weighs about 1 oz /28 grams each. Do not use floppy American cheese slices for this, but select sturdy Sharp Cheddar, Aged Gouda, or Pepper Jack slices. 

Gebakken kaasplak

8 square slices deli style sliced cheese
2 eggs
1 cup panko or breadcrumbs
4 tablespoons (55 grams) butter
Whole grain mustard

Lay out the cheese slices. Spread a teaspoon each of mustard on four slices and top each with a second slice. Beat the two eggs in a shallow dish. and pour the breadcrumbs in another shallow dish. 

Dip one of the stacked cheese slices in the egg, turn it over to coat the other side, and lift it out of the egg. Let it drip, and then coat the cheese with breadcrumbs on all six sides. Repeat with the rest of the cheese. 

Heat the butter in a frying pan. Dip the breaded cheese in the egg again, then again in the breadcrumbs and put them in the frying pan, repeating until all four cheese patties are in the pan. On medium heat, fry all sides of the cheese patties until golden brown, about five minutes. Serve warm.


Suikerbeestjes

"Er was er eens een suikerbeest" starts a sweet poem by famous Dutch author Annie M.G. Schmidt, about an animal made of sugar, a suikerbeest. "Suikerbeestjes", small sugar animals, are an old-fashioned Dutch confectionary, particularly associated with the celebration of Sinterklaas. These sweets are made in various shapes and colors, resembling small animals, and are crafted from sugar. 

Historically, suikerbeestjes were quite expensive due to the high cost of sugar, which had to be imported into the Netherlands. However, with the discovery and cultivation of sugar beets in the country, the cost of sugar and subsequently suikerbeestjes decreased significantly. Nowadays, they have lost against factory made sugary candy, and only a few professionals and home cooks will engage in the tradition. 

And it's not an easy feat either: the boiling sugar is poured into traditional wooden molds that are held together with clamps, and left to cool. As you can imagine, these sugar creatures can be quite fragile. In Schmidt's poem, the suikerbeestje's mom warns him and says "Pas dus maar op dat je niet breekt", be careful that you don't break.  

Well, I don't have the wooden molds, but I did want to make something sugary for Valentine's Day, especially since "suikerbeestje" can also be a romantic name for a lover. Valentine's Day is celebrated in the Netherlands, but it's a relatively new tradition that only gained popularity in the mid-1990s, influenced by the spread of American culture. 

I picked two types of sugary confections, both associated with Sinterklaassuikerbeestjes and borstplaat - and decided to try both. I used a heart-shaped silicone, heat resistant mold. The suikerbeestjes turned out to be hard as a rock, which is the intention I guess, and were just too big of a lump of sugar - they would do great with a smaller silicone mold, and in the shape of an animal to honor its name. The borstplaat was softer, more tender to the palate, and was perfect for nibbling on while drinking a cup of coffee - and ultimately won out. Borstplaat can be described as similar to fudge but differs in its consistency, being flatter and more brittle. The main ingredients in borstplaat are sugar and cream. 

The sugar can be enhanced with flavoring and food coloring. Be careful when pouring the sugar as it is incredibly hot, and allow the candy to sit overnight before removing it from the molds. If you live in a humid environment, it is probably of the essence to consume these as soon as possible, as the sugar will attract moisture. Makes 6 hearts.

Suikerbeestjes

For suikerbeestjes 
1/2 cup (100 grams) white sugar
1/2 cup (50 grams) powdered sugar
1 teaspoon vanilla essence or extract
3 tablespoons water

For borstplaat
1 cup (200 grams) white sugar
1 teaspoon vanilla essence or extract
3 tablespoons milk, water or heavy cream

Optional: edible glitter or sprinkles

Place the silicone mold on a solid surface, for example, a cutting board, so that you can easily move it out of the way while the sugar sets up. If you want to  use edible glitter or sprinkles, add a pinch to the bottom of each shape. 

Use a pan with a thick bottom, and make sure that the pan is tall enough to allow for the volume to double or triple. Mix the sugars with the vanilla and the liquid in the pan, and bring to a boil on a medium hot stove.  Stir frequently, until the sugar has dissolved. Continue to stir as the sugary syrup starts to bubble up and become "woolly", displaying a white, bubbly surface (see picture). 

Stir for three or four minutes, and then dip a fork in the hot sugar. Lift the fork up. If the syrup coats the tines of the fork without dripping off, it's ready to be taken off the stove. In the photo on the right, you can still see sugar crystals so it needs a few more minutes. 

Once off the heat, stir down the sugary mixture, until all the big bubbles have gone - this will ensure a nice, solid candy. Stir in a drop or two of food coloring if you wish, and stir until you have the desired color. Carefully pour the hot sugary mess into the molds. 

The sugar will set pretty quickly on the outside, but the inside will still be scalding hot, so don't be fooled. Allow it to sit in a safe place for several hours or overnight to set up. 


Amazon Shopping Suggestions


Disclaimer: if you buy through any of the links in the Amazon Prime Shopping Suggestions section, the Amazon Services LLC Associates Program will pay us a small commission on qualifying purchases. It does not increase your cost or price, and it will help us keep the website running. Your support is very much appreciated! 

Don't have Amazon Prime but want to give it a try? This link offers a 30 day trial. 


Rozijnenbrood

Breakfast is always a little bit of a feast in the Netherlands, especially on the weekends, when there is a bit more time to prepare something special. Our breakfasts are certainly not for the indecisive. Are you going to go for white soft rolls or crunchy ones? Beschuit, toast, or knäckebrot? White, brown or volkoren bread? Not to mention having to choose between the vast amount of toppings, sweet or savory, cold cuts, cheeses, eggs.....or are you skipping bread altogether and prefer a big bowl of pap, porridge? The breakfast table holds a dazzling array of choices, and is such a treasure trove of delights - worth taking time for.

The only thing I think we can all agree on is that savory comes first, and sweet comes last - but even that unwritten rule is sometimes hazy: where does a slice of bread with cheese and jam, or peanut butter and hagelslag fall? Is it all-in-one, or does it come after the savory and before the sweet? And is three slices of bread too much for our Calvinistic genes? Interesting things to ponder while enjoying a cup of coffee or tea, and another slice of something good :-)

One of the breads that always makes the breakfast table a little bit more festive and special is a pillowy loaf of raisin bread, rozijnenbrood. A sweet dough, flavored with just a hint of cinnamon, and juicy, sweet raisins all throughout the loaf. This bread is good with just a lick of butter, or topped with a slice of aged cheese. It can also be used as a base for wentelteefjes, or broodschoteltjes

Don't be alarmed by the large amount of raisins that go in the bread: they will all fit! For this recipe, I rinse the raisins in warm water, let them sit in the warm water for a few minutes, then set them out to air dry for a couple of hours. I want them somewhat plump-ish on the inside but not overly saturated, and dry on the outside. 

Rozijnenbrood

2 cups (250 grams) raisins
1 3/4 cup (250 grams) all-purpose flour
2 tablespoons (25 grams) sugar
1/2 teaspoon (4 grams) salt
1/8 teaspoon cinnamon
1/2 cup (125 ml) water or milk, lukewarm
2 teaspoons (8 grams) active dry yeast
3 tablespoons (40 grams) butter, softened
1 egg, beaten

Rinse the raisins in lukewarm water, and set them out to air dry. 

Mix the flour, sugar, salt, and cinnamon in a bowl. Sprinkle the yeast on top of the lukewarm water or
milk and let it stand for five minutes, or until it's frothy, then mix it in with the dry ingredients. Knead, either in a machine or by hand, until the dough more or less comes together, then add the butter and most of the egg (keep two teaspoons behind for brushing the top). Continue to knead the dough until you have  cohesive whole, about three to four minutes. Pat the dough into a ball, cover and let it rise for a good thirty minutes, or until about not quite doubled in size. 

Dust the counter with a little bit of flour, pat the air out of the dough, and put a handful of raisins on top. With the use of a scraper, or a floured hand, fold the dough over itself, incorporating the raisins. Repeat this until all the raisins have found a spot in the dough. 

Shape the dough into an oval loaf, grease a 8 x 4 inch (20 x 10 cm) loaf tin, and place the dough inside. Cover and let rise at room temperature until the dough peeks over the top: about an hour, but depending on the actual temperature of the room, this may take less - just keep an eye on it. When ready, brush the top with the remaining egg.

Heat the oven to 350F/175C and bake the loaf, in the middle, for about fifteen minutes, then place aluminum foil over the top to keep it from browning too fast. Bake for another twenty minutes, or until golden brown*. The internal temperature should measure 185F/85F and rising (meaning that the digital thermometer reaches the temperature pretty quickly and continues to rise beyond that). 

Pull the bread, let it cool in the tin, and remove it when it's lukewarm. Let it cool down on a rack before cutting. 


 * I don't follow the "bread is done when it sounds hollow when you tap it" because I don't know what "hollow" sounds like to anybody else, so I temp the bread with a digital thermometer. 

Soepballetjes

"Geef mij maar soep, soep, soep met balletjes
" sang Rita Corita already in the 50's, and for those of you who listen to the Groeten Uit Het Zuiden podcast from Jordy Graat and Rob Kemps, may remember that last season's soup component started with the "Soep met Ballen" song by Leo van Helmond. 

Even the sheep Veronica, a fantastic poem by Annie M.G. Schmidt, brings up "soep met ballen", soup with meatballs, as a delightful, delicious, start of a dinner. It is truly an engrained and traditional addition to our kitchen, to our many soups, and delights many, young and old. 

So what are these soepballetjes? That's an easy answer: small meatballs that are added to traditionally tomato or vegetable soup, but they can also be added to other soups. Beyond that there is a vast choice of flavors, combinations, and options.  Commercially, soepballetjes can be bought pre-made and blanched in jars with bouillon, in cans with salted water, and in the meat section at the grocery store or at the butchers you can also buy them pre-seasoned and raw. 

We have soepballetjes made with beef, with half-om-half (half beef, half pork), made with chicken, turkey, or vegan. They come with different seasonings and in different variations. I've seen people use, outside of salt and white or black pepper, any combination of onion powder, nutmeg, coriander, ginger, mace, cardamom, chili powder, paprika, bay leaf, and a whole host of dried spices: parsley, thyme, oregano....

And then of course there are the soepballetjes made at home, where those who do make them, have their own family recipe or preferences. Some make them fresh while making the soup, others make a big batch every now and then (a fun family affair!), blanch and freeze them, still others fry them first so that they get some color. Some make them small, others make them bigger. Some only use meat, others add breadcrumbs or egg. All this to say that there is no "official", one way to make soepballetjes. But if you've never made them before and would like to give it a try, here's a very basic recipe. 

I make mine ahead of time by cooking them in bouillon and storing them in a container in the freezer. That way, when I make soup, I just grab a handful and add them last minute. The following recipe makes about 90 soepballetjes (I portion mine out at 5 grams, 0.2 oz). 

Soepballetjes

8 oz (225 grams) ground beef
8 oz (225 grams) ground pork
2 tablespoons bread crumbs
Salt
Pepper
Optional: nutmeg
1 bouillon cube of choice

Mix the two meats together with the breadcrumbs, and season with salt and pepper. Put a pot on the stove with 4 - 6 cups (1 - 1.5 liter) of water, add the bouillon cube (I use vegetable bouillon), and bring up to a low simmer (do not boil). Use a small ice cream scoop (mine is 1 teaspoon sized) to portion the meat and roll one or two mini marbles, as a tester. Add to the simmering bouillon. They will sink to the bottom first, and as they cook, float to the top. Remove the tester and taste. Adjust the seasonings to your liking, but remember that the flavor should not overpower the soup they're going to be in. 

Continue to portion out the meatballs. I make them fairly small, at 5 grams each (0.2 oz) but that is purely a personal preference, so go with what you feel is the right size for you. Simmer them in the bouillon, and remove them a few minutes after they float. Spread out on a baking sheet, cool, and then freeze them. Once frozen they can be kept in a container in the freezer. 

The bouillon can be used as a base for soup, so if you are doing that today, keep some of the soepballetjes behind - about four or five per person. As pork has quite a bit of fat, you may want to degrease it first, but again: that's a personal preference.